 |

Database
Management System
(CS403)
VU
Lecture No.
31
Reading
Material
Raghu
Ramakrishnan,
Johannes
Gehkre,
`Database
Chapter
17
Management
Systems', Second edition
Overview of
Lecture
o Types of
Joins
o Relational
Calculus
o Normalization
In the
previous lecture we studied
that rows from two
tables can be merged with
each
other
using the Cartesian product.
In real life, we very rarely
find a situation when
two
tables need to be merged the
way Cartesian product, that
is, every row of
one
table is
merged with every row of
the other table. The
form of merging that is
useful
and
used most often is `join'. In
the following, we are going
to discuss different
forms of
join.
Inner
Join
Only
those rows from two tables
are joined that have
same value in the
common
attribute.
For example, if we have two
tables R and S with
schemes
R (a, b,
c, d) and S (f, r, h, a), then we
have `a' as common attribute
between these
twit
tables. The inner join
between these two tables can
be performed on the basis
of
`a'
which is the common
attribute between the two.
The common attributes are
not
required
to have the same name in
both tables, however, they
must have the same
domain in
both tables. The attributes
in both tables are generally
tied in a primary-
foreign
key relationship but that
also is not required.
Consider the following
two
tables:
226

Database
Management System
(CS403)
VU
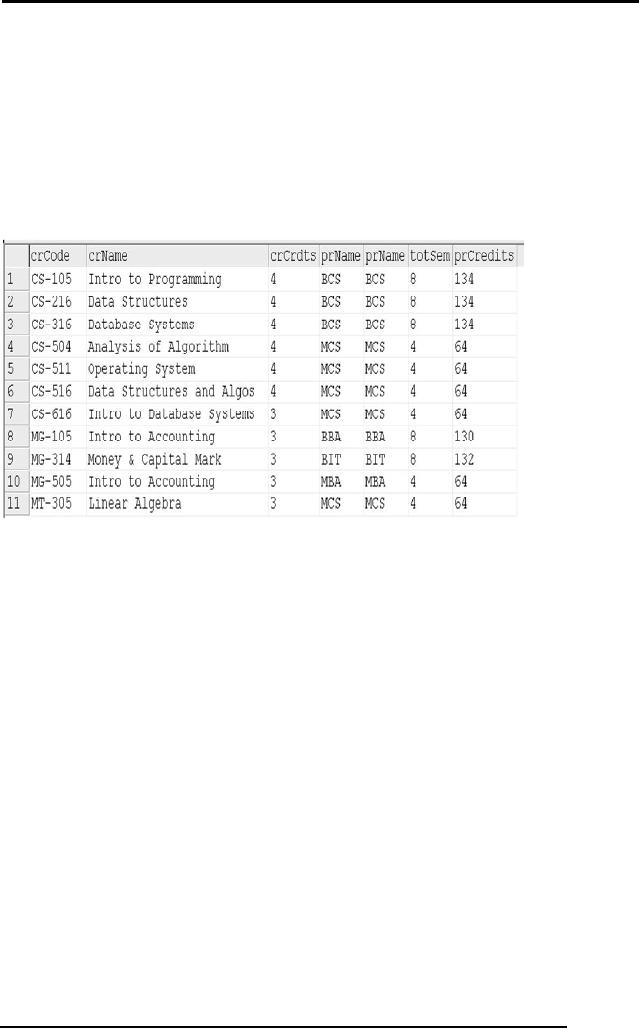
Fig. 1:
COURSE and PROGRAM tables
with common attribute
prName
The
figure shows two tables,
COURSE and PROGRAM. The
COURSE.prName and
PROGRAM.
prName are the common
attributes between the two
tables; incidentally
the
attributes have the same
names and definitely the
same domains. If we
apply
inner
join on these tables, the
rows from both tables will be
merged based on the
values of
common attribute, that is,
the prName. Like, row
one of COURSE has
the
value
`BCS' in attribute prName. On
the other hand, row
number 2 in PROGRAM
table
has the value `BCS'. So
these two rows will merge
and form one row of
the
resultant
table of the inner join
operation. As has been said before,
the participating
tables of
inner join are generally
tied in a primary-foreign key
link, so the common
attribute
is PK in one of the tables. It
means the table in which
the common attribute
is FK,
the rows from this
table will not be merged
with more that one
row from the
other
table. Like in the above
example, each row from
COURSE table will
find
exactly
one match in PROGRAM table,
since the prName is the PK in
PROGRAM
table.
The
inner join can be
implemented using different
techniques. One possibility is
that
we may
find `inner join' operation
as such, like:
227

Database
Management System
(CS403)
VU
�
SELECT *
FROM course INNER JOIN program ON
course.prName
= program.prName
or
�
Select *
FROM Course c INNER JOIN program p
ON
c.prName
= p.prName
The
output after applying inner
join on tables of figure 1 will be as
follows:
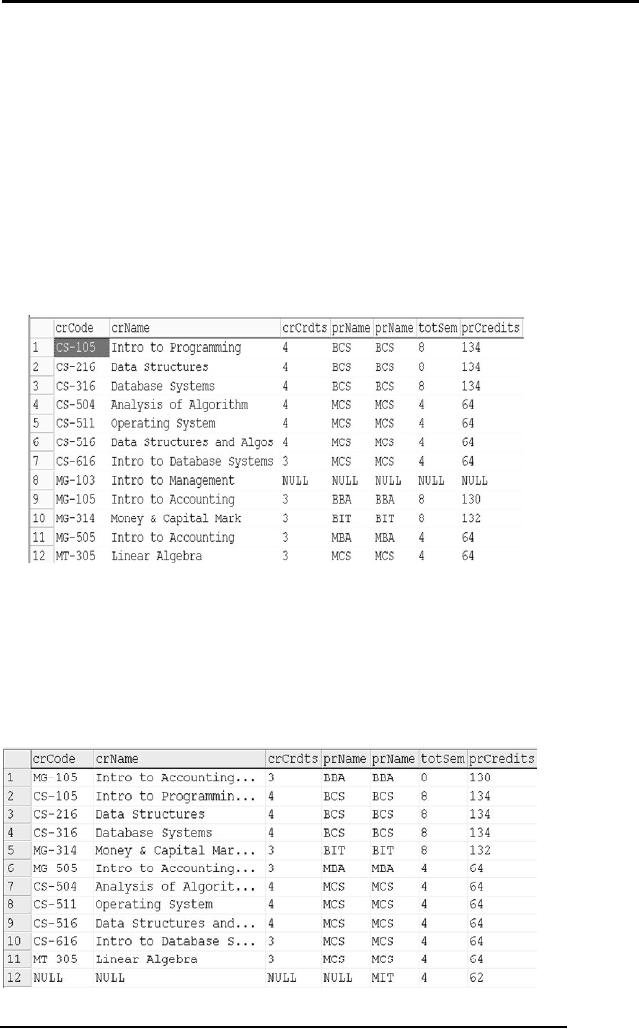
Fig. 2:
Output of inner join on tables of
figure 1
As can be
seen in the figure, the
common attribute appears
twice in the output of
inner
join;
that is, from both
the tables. Another possible
approach to implement inner
join
can be as
follows:
SELECT *
FROM course, program WHERE
course.prName
=
program.prName
The
output of this statement will be exactly
the same as is given in
figure 2.
Outer
Join
SQL
supports some interesting variants of
the join operation that
rely on null values,
called
outer joins. Consider the
two tables COURSE and
PROGRAM given in
figure
1 and
their inner join given in
figure 2. Tuples of COURSE
that do not match
some
row in
PROGRAM according to the
inner join condition
(COURSE.prName =
PROGRAM.prName)
do not appear in the result. In an
outer join, on the other
hand,
COURSE
rows without a matching
PROGRAM row appear exactly once in
the result,
with
the result columns inherited
from PROGRAM assigned null
values.
228

Database
Management System
(CS403)
VU
In fact,
there are several variants
of the outer join idea. In a
right outer join,
COURSE
rows
without a matching PROGRAM
row appear in the result,
but not vice versa. In
a
left
outer join, PROGRAM rows
without a matching COURSE
row appear in the
result,
but not vice versa. In a
full outer join, both
COURSE and PROGRAM
rows
without a
match appear in the result.
(Of course, rows with a
match always appear in
the
result, for all these
variants, just like the
usual joins or inner
joins).
SQL-92
allows the desired type of
join to be specified in the
FROM clause. For
example,
�
Select *
from COURSE c RIGHT OUTER
JOIN
PROGRAM p
on c.prName = p.prName
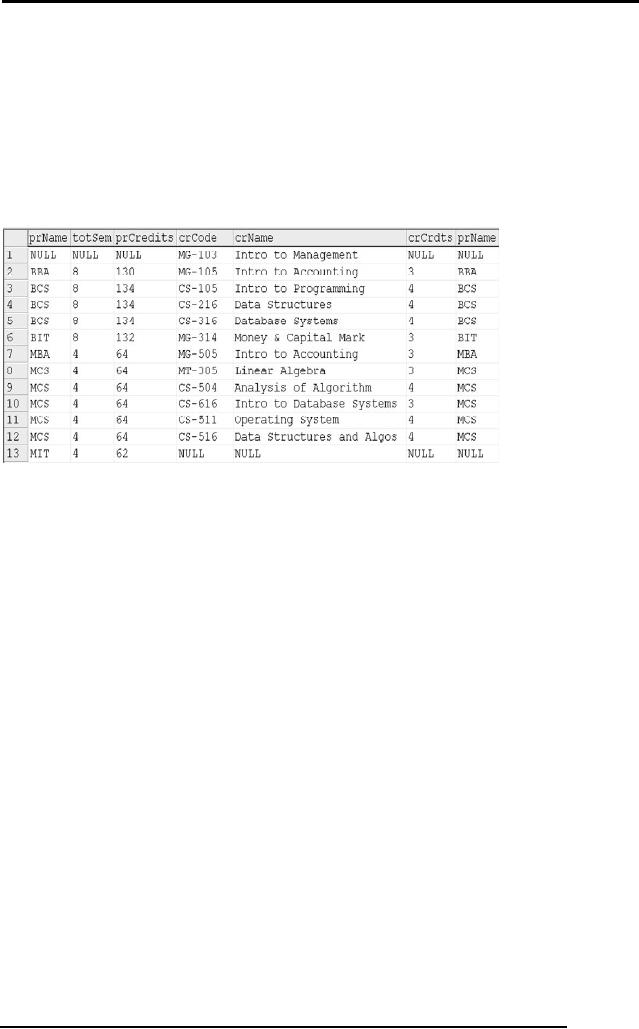
Fig. 3:
Right outer join of the
tables in figure 1
In figure
3 above, the row number 8 is
the non matching row of
COURSE that
contains
nulls in the attributes
corresponding to PROGRAM table,
rest of the rows
are
the
same as in inner join of
figure 2.
�
Select *
from COURSE c LEFT OUTER JOIN
PROGRAM p
on c.prName = p.prName
229

Database
Management System
(CS403)
VU
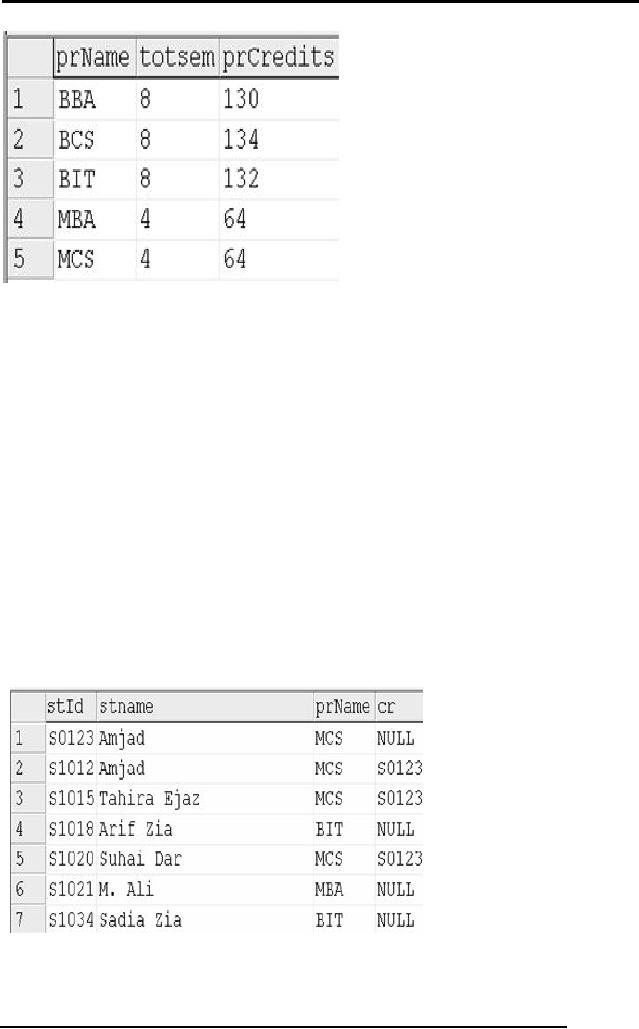
Fig. 4:
Left outer join of the
tables in figure 1
In figure
4 above, the row number 12
is the non matching row of
PROGRAM that
contains
nulls in the attributes
corresponding to COURSE table,
rest of the rows
are
the
same as in inner join of
figure 2.
�
Select *
from COURSE c FULL OUTER
JOIN
PROGRAM p
on c.prName = p.prName
Fig. 5:
Full outer join of the
tables in figure 1
In figure
5 above, the row number 1
and 13 are the non
matching rows from
both
tables,
rest of the rows are the
same as in inner join of
figure 2.
Semi
Join
Another
form of join that involves
two operations. First inner
join is performed on
the
participating
tables and then resulting
table is projected on the
attributes of one
table.
The
advantage of this operation is
that we can know the
particular rows of one
table
that
are involved in inner join.
For example, through semi
join of COURSE and
PROGRAM
tables we will get the rows
of COURSE that have matching
rows in
PROGRAM,
or in other words, the
courses that are part of
any program. Same can
be
performed
other way round. SQL
does not provide any
operator as such, but can
be
implemented
by select and inner join
operations, for
example.
�
SELECT
distinct p.prName, totsem,
prCredits FROM program p
inner
JOIN
course c ON p.prName =
c.prName
230

Database
Management System
(CS403)
VU
Fig. 6:
Semi join of tables in figure
1
Self
Join
In self
join a table is joined with
itself. This operation is
used when a table
contains
the
reference of itself through
PK, that is, the PK
and the FK are both
contained in the
same
table supported by the
referential integrity constraint.
For example, consider
STUDENT
table having an attribute
`cr' storing the id of the
student who is the
class
representative
of a particular class. The
example table is shown in
figure 7, where a
CR has
been specified for the MCS
class, rest of the class
students contain a null in
the
`cr' attribute.
Fig. 7:
Example STUDENT table
Applying
self join on this
table:
231

Database
Management System
(CS403)
VU
�
SELECTa.stId,
a.stName, b.stId, b.stName FROM
student a, student b
WHERE
a.cr = b.stId
Since
same table is involved two
times in the join, we have
to use the alias. The
above
statement
displays the names of the
students and of the
CR.
Fig. 8:
Self join of STUDENT table of
figure 7
Subquery
Subquery
is also called nested query
and is one of the most
powerful features of SQL.
A nested
query is a query that has
another query embedded within
it; the embedded
query is
called a subquery. When
writing a query, we sometimes need to
express a
condition
that refers to a table that must
itself be computed. The
query used to
compute
this subsidiary table is a
subquery and appears as part
of the main query. A
subquery
typically appears within the
WHERE clause of a query.
Subqueries can
sometimes appear in
the FROM clause or the
HAVING clause. Here we have
discussed
only subqueries that appear in the
WHERE clause. The treatment
of
subqueries
appearing elsewhere is quite
similar. Examples of subqueries that
appear
in the
FROM clause are discussed in
following section.
Lets
suppose we want to get the
data of the student with the
maximum cgpa, we
cannot
get them within a same
query since to get the
maximum cgpa we have to
apply
the
group function and with
group function we cannot
list the individual
attributes. So
we use
nested query here, the
outer query displays the
attributes with the
condition on
cgpa
whereas the subquery finds
the maximum cgpa as shown
below:
�
SELECT *
from student where cgpa
>
(select
max(cgpa) from student where
prName = 'BCS`)
232

Database
Management System
(CS403)
VU
Fig. 9:
STUDENT table and nested
query applied on it
We have
to take care of the operator
being applied in case of
subquery in the where
clause.
The type of operator depends
on the result set being
returned by the
subquery.
If the
output expected from the
subquery is a single value, as is
the case in the
above
example,
then we can use operators
like =, <, >, etc. However, if the
subquery returns
multiple
values then we can use
operators like IN, LIKE etc. The IN
operator allows
us to
test whether a value is in a
given set of elements; an SQL
query is used to
generate
the set to be tested. We can
also use the NOT IN
operator where
required.
The
subquery can be nested to
any level, the queries are
evaluated in the reverse
order,
and
that is, the inner most is
evaluated first, then the
outer one and finally
the outer
most.
ACCESS
CONTROL
SQL-92
supports access control through
the GRANT and REVOKE
commands. The
GRANT
command gives users
privileges to base tables
and views. The syntax of
this
command
is as follows:
GRANT
privileges ON object TO users [ WITH
GRANT OPTION ]
For
our purposes object is
either a base table or a
view. Several privileges can
be
specified,
including these:
SELECT:
The right to access (read)
all columns of the table
specified as the
object,
including
columns added later through
ALTER TABLE commands.
INSERT(column-name): The
right to insert rows with
(non-null
or
nondefault) values
in the
named column of the table named as
object. If this right is to be
granted with
233

Database
Management System
(CS403)
VU
respect
to all columns, including
columns that might be added
later, we can simply
use
INSERT. The privileges
UPDATE(column-name) and
UPDATE are similar.
DELETE:
The right to delete rows
from the table named as
object.
REFERENCES(column-name): The
right to define foreign keys
(in other tables)
that
refer to
the speci_ed column of the
table object. REFERENCES
without a column
name
speci_ed denotes this right with
respect to all columns,
including any that
are
added
later.
If a user
has a privilege with the
grant option, he or she can
pass it to another
user
(with or
without the grant option) by
using the GRANT command. A
user who creates
a base
table automatically has all
applicable privileges on it,
along with the right
to
grant
these privileges to other
users. A user who creates a
view has precisely
those
privileges
on the view that he or she
has on every
one of
the view or base tables
used
to define
the view. The user
creating the view must have
the SELECT privilege
on
each
underlying table, of course,
and so is always granted the
SELECT privilege on
the
view. The creator of the
view has the SELECT
privilege with the grant
option
only if
he or she has the SELECT
privilege with the grant
option on every
underlying
table.
In
addition, if the view is
updatable and the user
holds INSERT, DELETE,
or
UPDATE
privileges (with or without
the grant option) on the
(single) underlying
table,
the
user automatically gets the
same privileges on the
view.
Only
the owner of a schema can
execute the data definition
statements CREATE,
ALTER,
and DROP on that schema.
The right to execute these
statements cannot be
granted
or revoked.
In
conjunction with the GRANT
and REVOKE commands, views
are an important
component
of the security mechanisms
provided by a relational DBMS. We
will
discuss
the views later in detail.
Suppose that user Javed has
created the tables
COURSE,
PROGRAM and STUDENT. Some
examples of the GRANT
command
that
Javed can now execute
are listed below:
�
GRANT
INSERT, DELETE ON COURSE TO
Puppoo WITH GRANT
OPTION
�
GRANT
SELECT ON COURSE TO
Mina
�
GRANT
SELECT ON PROGRAM TO Mina
WITH GRANT OPTION
234

Database
Management System
(CS403)
VU
There is
a complementary command to GRANT
that allows the withdrawal
of
privileges.
The syntax of the REVOKE
command is as follows:
REVOKE
[GRANT OPTION FOR]
privileges ON object FROM
users
{RESTRICT |
CASCADE}
The
command can be used to
revoke either a privilege or
just the grant option on
a
privilege
(by using the optional
GRANT OPTION FOR clause).
One of the two
alternatives,
RESTRICT or CASCADE, must be specified;
we will see what this
choice
means shortly. The intuition
behind the GRANT command is
clear: The
creator
of a base table or a view is
given all the appropriate
privileges with respect
to
it and is
allowed to pass these
privileges including the
right to pass along a
privilege
to other
users. The REVOKE command
is, as expected, intended to
achieve the
reverse: A
user who has granted a
privilege to another user
may change his mind
and
want to
withdraw the granted
privilege. The intuition
behind exactly what effect
a
REVOKE
command has is complicated by
the fact that a user
may be granted the
same
privilege multiple times,
possibly by different
users.
When a
user executes a REVOKE
command with the CASCADE
keyword, the effect
is to
withdraw the named privileges or
grant option from all
users who currently
hold
these
privileges solely through a
GRANT command that was
previously executed by
the
same user who is now
executing the REVOKE
command. If these users
received
the
privileges with the grant
option and passed it along,
those recipients will also lose
their
privileges as a consequence of the
REVOKE command unless they
also received
these
privileges independently. Consider
what happens after the
following sequence
of commands,
where Javed is the creator
of COURSE.
GRANT
SELECT ON COURSE TO Alia WITH
GRANT OPTION (executed
by
Javed)
GRANT
SELECT ON COURSE TO Bobby WITH
GRANT OPTION (executed by
Alia)
REVOKE
SELECT ON COURSSE FROM Alia
CASCADE (executed by
Javed)
Alia
loses the SELECT privilege
on COURSE, of course. Then
Bobby, who received
this
privilege from Alia, and
only Alia, also loses this
privilege. Bobby's privilege
is
said to
be abandoned when the
privilege that it was
derived from (Alia's
SELECT
privilege
with grant option, in this
example) is revoked. When
the CASCADE
235

Database
Management System
(CS403)
VU
keyword
is specified, all abandoned
privileges are also revoked
(possibly causing
privileges
held by other users to become
abandoned and thereby
revoked recursively).
If the
RESTRICT keyword is specified in
the REVOKE command, the
command is
rejected
if revoking the privileges just
from
the users specified in the
command would
result in
other privileges becoming
abandoned.
Consider
the following sequence, as
another example:
GRANT
SELECT ON COURSE TO Alia
WITH GRANT OPTION (executed by
Javed)
GRANT
SELECT ON COURSE TO Bobby
WITH GRANT OPTION (executed by
Javed)
GRANT
SELECT ON COURSE TO Bobby
WITH GRANT OPTION (executed by
Alia)
REVOKE
SELECT ON COURSE FROM Alia
CASCADE (executed by
Javed)
As
before, Alia loses the
SELECT privilege on COURSE.
But what about
Bobby?
Bobby
received this privilege from
Alia, but he also received it
independently
(coincidentally,
directly from Javed). Thus
Bobby retains this
privilege. Consider a
third
example:
GRANT
SELECT ON COURSE TO Alia
WITH GRANT OPTION (executed by
Javed)
GRANT
SELECT ON COURSE TO Alia
WITH GRANT OPTION (executed by
Javed)
REVOKE
SELECT ON COURSE FROM Alia
CASCADE (executed by
Javed)
Since
Javed granted the privilege
to Alia twice and only
revoked it once, does Alia
get
to keep
the privilege? As per the
SQL-92 standard, no. Even if
Javed absentmindedly
granted
the same privilege to Alia
several times, he can revoke
it with a single
REVOKE
command. It is possible to revoke
just the grant option on a
privilege:
GRANT
SELECT ON COURSE TO Alia
WITH GRANT OPTION (executed by
Javed)
REVOKE
GRANT OPTION FOR SELECT ON
COURSE FROM Alia CASCADE
(executed
by
Javed)
This
command would leave Alia
with the SELECT privilege on
COURSE, but Alia
no longer
has the grant option on
this privilege and therefore
cannot pass it on to
other
users.
Summary
In this
lecture we have studied the
different types of joins,
with the help of which
we
can
join different tables. We
also discussed two major
commands of access control
that
are also considered the
part of Data Control
Language component of SQL.
The
last
part of this lecture handout
is taken from chapter 17 of
the reference given.
The
236

Database
Management System
(CS403)
VU
interested
users are recommended to see the
book for detailed discussion on
the topic.
There is
a lot left on SQL, for
our course purposes however we
have studied enough.
Through
extensive practice you will
have clear understanding
that will help you in
further
learning.
Exercise:
Practice
for all various types of
Joins and Grant and
Revoke commands.
237
Table of Contents:
- Introduction to Databases and Traditional File Processing Systems
- Advantages, Cost, Importance, Levels, Users of Database Systems
- Database Architecture: Level, Schema, Model, Conceptual or Logical View:
- Internal or Physical View of Schema, Data Independence, Funct ions of DBMS
- Database Development Process, Tools, Data Flow Diagrams, Types of DFD
- Data Flow Diagram, Data Dictionary, Database Design, Data Model
- Entity-Relationship Data Model, Classification of entity types, Attributes
- Attributes, The Keys
- Relationships:Types of Relationships in databases
- Dependencies, Enhancements in E-R Data Model. Super-type and Subtypes
- Inheritance Is, Super types and Subtypes, Constraints, Completeness Constraint, Disjointness Constraint, Subtype Discriminator
- Steps in the Study of system
- Conceptual, Logical Database Design, Relationships and Cardinalities in between Entities
- Relational Data Model, Mathematical Relations, Database Relations
- Database and Math Relations, Degree of a Relation
- Mapping Relationships, Binary, Unary Relationship, Data Manipulation Languages, Relational Algebra
- The Project Operator
- Types of Joins: Theta Join, Equi–Join, Natural Join, Outer Join, Semi Join
- Functional Dependency, Inference Rules, Normal Forms
- Second, Third Normal Form, Boyce - Codd Normal Form, Higher Normal Forms
- Normalization Summary, Example, Physical Database Design
- Physical Database Design: DESIGNING FIELDS, CODING AND COMPRESSION TECHNIQUES
- Physical Record and De-normalization, Partitioning
- Vertical Partitioning, Replication, MS SQL Server
- Rules of SQL Format, Data Types in SQL Server
- Categories of SQL Commands,
- Alter Table Statement
- Select Statement, Attribute Allias
- Data Manipulation Language
- ORDER BY Clause, Functions in SQL, GROUP BY Clause, HAVING Clause, Cartesian Product
- Inner Join, Outer Join, Semi Join, Self Join, Subquery,
- Application Programs, User Interface, Forms, Tips for User Friendly Interface
- Designing Input Form, Arranging Form, Adding Command Buttons
- Data Storage Concepts, Physical Storage Media, Memory Hierarchy
- File Organizations: Hashing Algorithm, Collision Handling
- Hashing, Hash Functions, Hashed Access Characteristics, Mapping functions, Open addressing
- Index Classification
- Ordered, Dense, Sparse, Multi-Level Indices, Clustered, Non-clustered Indexes
- Views, Data Independence, Security, Vertical and Horizontal Subset of a Table
- Materialized View, Simple Views, Complex View, Dynamic Views
- Updating Multiple Tables, Transaction Management
- Transactions and Schedules, Concurrent Execution, Serializability, Lock-Based Concurrency Control, Deadlocks
- Incremental Log with Deferred, Immediate Updates, Concurrency Control
- Serial Execution, Serializability, Locking, Inconsistent Analysis
- Locking Idea, DeadLock Handling, Deadlock Resolution, Timestamping rules