 |
7
Solar
Power
This
chapter provides an introduction to
the components of a standalone
photovoltaic
system. The
word standalone refers to
the fact that the
system
works
without any connection to an
established power grid. In
this chapter,
we
will present the basic
concepts of the generation
and storage of
photovol-
taic
solar energy. We will also
provide a method for
designing a functional
solar
system with limited access
to information and
resources.
This
chapter only discusses the
use of solar energy for
the direct production
of
electricity (photovoltaic
solar energy). Solar
energy can also be used
to
heat
fluids
(thermal
solar energy) which
can then be used as a heat
source
or
to turn a turbine to generate
electricity. Thermal solar
energy systems are
beyond
the scope of this
chapter.
Solar
energy
A
photovoltaic system is based on
the ability of certain
materials to convert
the
radiant energy of the sun
into electrical energy. The
total amount of solar
energy
that lights a given area is
known as irradiance
(G) and it is
measured
in
watts
per square meter (W/m2). The instantaneous values
are normally
averaged
over a period of time, so it is
common to talk about total
irradiance
per
hour, day or month.
Of
course, the precise amount
of radiation that arrives at
the surface of the
Earth
cannot be predicted with
high precision, due to
natural weather
varia-
tions.
Therefore it is necessary to work
with statistical data based
on the "so-
lar
history" of a particular place.
This data is gathered by a
weather station
over
a long period and is
available from a number of
sources, as tables or
211
212
Chapter
7: Solar Power
databases.
In most cases, it can be
difficult to
find detailed
information about
a
specific area,
and you will need to
work with approximate
values.
A
few organizations have
produced maps that include
average values of
daily
global
irradiation for different
regions. These values are
known as peak
sun
hours
or
PSHs. You
can use the PSH
value for your region to
simplify your
calculations.
One unit of "peak sun"
corresponds to a radiation of 1000
Watts
per
square meter. If we find that
certain area has 4 PSH in
the worst of the
months,
it means that in that month
we should not expect a daily
irradiation
bigger
than 4000 W/m2 (day).
The peak sun hours
are an easy way to
repre-
sent
the worst case average of
irradiation per day.
Low
resolution PSH maps are
available from a number of
online sources, such
as
http://www.solar4power.com/solar-power-global-maps.html. For
more de-
tailed
information, consult a local
solar energy vendor or
weather station.
What
about wind power?
It
is possible to use a wind
generator in place of solar
panels when an
autonomous
system is being designed for
installation on a hill or
mountain.
To
be effective, the average
wind speed over the
year should be at least 3
to
4
meter per second, and
the wind generator should be
6 meters higher than
other
objects within a distance of
100 meters. A location far
away from the
coast
usually lacks sufficient
wind energy to support a
wind powered system.
Generally
speaking, photovoltaic systems
are more reliable than
wind gen-
erators,
as sunlight is more available
than consistent wind in most
places. On
the
other hand, wind generators
are able to charge batteries
even at night, as
long
as there is sufficient
wind. It is of course possible to
use wind in con-
junction
with solar power to help
cover times when there is
extended cloud
cover,
or when there is insufficient
wind.
For
most locations, the cost of
a good wind generator is not
justified by
the
meager
amount of power it will add
to the overall system. This
chapter will
therefore
focus on the use of solar
panels for generating
electricity.
Photovoltaic
system components
A
basic photovoltaic system
consists of four main
components: the solar
panel, the
batteries, the
regulator, and
the load. The
panels are responsi-
ble
for collecting the energy of
the sun and generating
electricity. The
battery
stores
the electrical energy for
later use. The regulator
ensures that panel
and
battery are working together
in an optimal fashion. The
load refers to any
device
that requires electrical
power, and is the sum of
the consumption of
all
Chapter
7: Solar Power
213
electrical
equipment connected to the
system. It is important to
remember
that
solar panels and batteries
use direct
current (DC).
If
the range of operational
voltage of your equipment
does not fit the
voltage
supplied
by your battery, it will
also be necessary to include
some type of
converter. If the
equipment that you want to
power uses a different DC
volt-
age
than the one supplied by
the battery, you will
need to use a DC/DC
con-
verter. If some of
your equipment requires AC
power, you will need to
use a
DC/AC
converter, also
known as an inverter.
Every
electrical system should
also incorporate various
safety devices in the
event
that something goes wrong.
These devices include proper
wiring, cir-
cuit
breakers, surge protectors,
fuses, ground rods, lighting
arrestors, etc.
The
solar panel
The
solar
panel is composed of
solar cells that collect
solar radiation and
transform
it into electrical energy.
This part of the system is
sometimes referred
to
as a solar
module or
photovoltaic
generator.
Solar
panel arrays can
be
made
by connecting a set of panels in
series and/or parallel in
order to provide
the
necessary energy for a given
load. The electrical current
supplied by a so-
lar
panel varies proportionally to
the solar radiation. This
will vary according
to
climatological
conditions, the hour of the
day, and the time of
the year.
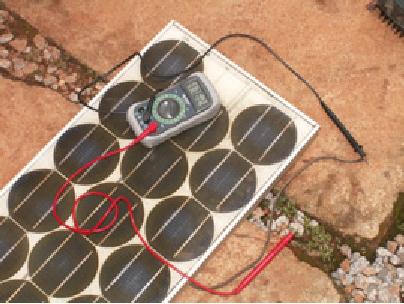
Figure
7.1: A solar
panel
Several
technologies are used in the
manufacturing of solar cells.
The most
common
is crystalline silicon, and
can be either monocrystalline or
polycrystal-
line.
Amorphous silicon can be
cheaper but is less
efficient at converting
solar

214
Chapter
7: Solar Power
energy
to electricity. With a reduced
life expectancy and a 6 to 8%
transforma-
tion
efficiency, amorphous silicon is
typically used for low
power equipment,
such
as portable calculators. New
solar technologies, such as
silicon ribbon
and
thin film photovoltaics, are
currently under development.
These technolo-
gies
promise higher efficiencies
but are not yet
widely available.
The
battery
The
battery
stores
the energy produced by the
panels that is not
immedi-
ately
consumed by the load. This
stored energy can then be
used during pe-
riods
of low solar irradiation.
The battery component is
also sometimes called
the
accumulator. Batteries
store electricity in the
form of chemical
energy.
The
most common type of
batteries used in solar
applications are
maintenance-free
lead-acid batteries, also
called recombinant
or
VRLA
(valve
regulated lead
acid)
batteries.
Figure
7.2: A 200 Ah lead-acid
battery. The negative
terminal was broken due
to
weight
on the terminals during
transportation.
Aside
from storing energy, sealed
lead-acid batteries also
serve two impor-
tant
functions:
�
They are able to provide an
instantaneous power superior to
what the array
of
panels can generate. This
instantaneous power is needed to
start some
appliances,
such as the motor of a
refrigerator or a pump.
�
They determine the operating
voltage of your
installation.
Chapter
7: Solar Power
215
For
a small power installation
and where space constraints
are important,
other
type of batteries (such as
NiCd, NiMh, or Li-ion) can
be used. These
types
of batteries need a specialized
charger/regulator and cannot
directly
replace
lead-acid batteries.
The
regulator
The
regulator
(or more
formally, the solar
power charge
regulator)
assures
that
the battery is working in
appropriate conditions. It avoids
overcharging
or
overdischarging
the
battery, both of which are
very detrimental to the life
of
the
battery. To ensure proper
charging and discharging of
the battery, the
regu-
lator
maintains knowledge of the
state
of charge (SoC) of the
battery. The
SoC
is estimated based on the
actual voltage of the
battery. By measuring
the
battery voltage and being
programmed with the type of
storage technol-
ogy
used by the battery, the
regulator can know the
precise points where
the
battery
would be overcharged or excessively
discharged.
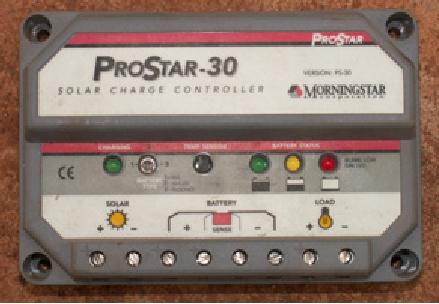
Figure
7.3: A 30 Amp solar charge
controller
The
regulator can include other
features that add valuable
information and
security
control to the equipment.
These features include
ammeters, voltme-
ters,
measurement of ampere-hour, timers,
alarms, etc. While
convenient,
none
of these features are
required for a working
photovoltaic system.
The
converter
The
electricity provided by the
panel array and battery is
DC at a fixed
volt-
age.
The voltage provided might
not match what is required
by your load. A
direct/alternating
(DC/AC) converter, also
known as inverter,
converts
216
Chapter
7: Solar Power
the
DC current from your
batteries into AC. This
comes at the price of
losing
some
energy during the
conversion. If necessary, you
can also use
convert-
ers
to obtain DC at voltage level
other than what is supplied
by the batteries.
DC/DC
converters also
lose some energy during
the conversion. For
opti-
mal
operation, you should design
your solar-powered system to
match the
generated
DC voltage to match the
load.
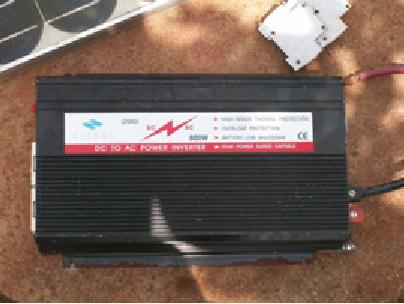
Figure
7.4: An 800 Watt DC/AC
converter (power
inverter)
The
load
The
load
is the
equipment that consumes the
power generated by your
energy
system.
The load may include
wireless communications equipment,
routers,
workstations,
lamps, TV sets, VSAT modems,
etc. Although it is not
possible to
precisely
calculate the exact total
consumption of your equipment, it is
vital to
be
able to make a good
estimate. In this type of
system it is absolutely
nec-
essary
to use efficient
and low power equipment to
avoid wasting energy.
Putting
it all together
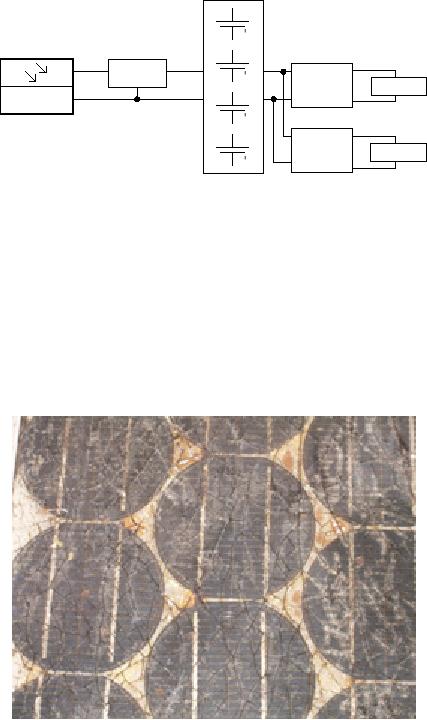
The
complete photovoltaic system
incorporates all of these
components. The
solar
panels generate power when
solar energy is available.
The regulator
ensures
the most efficient
operation of the panels and
prevents damage to
the
batteries. The battery bank
stores collected energy for
later use. Con-
verters
and inverters adapt the
stored energy to match the
requirements of
your
load. Finally, the load
consumes the stored energy
to do work. When all
of
the components are in
balance and are properly
maintained, the
system
will
support itself for
years.
Chapter
7: Solar Power
217
+
+
Regulator
DC/DC
DC
load
+
Solar
panels
+
Inverter
AC
load
Battery
bank
Figure
7.5: A solar installation
with DC and AC
loads
We
will now examine each of
the individual components of
the photovoltaic
system
in greater detail.
The
solar panel
An
individual solar panel is
made of many solar cells.
The cells are
electri-
cally
connected to provide a particular
value of current and
voltage. The indi-
vidual
cells are properly
encapsulated to provide isolation
and protection
from
humidity and
corrosion.
Figure
7.6: The effect of water
and corrosion in a solar
panel
There
are different types of
modules available on the
market, depending on
the
power demands of your
application. The most common
modules are
composed
of 32 or 36 solar cells of crystalline
silicon. These cells are
all of
equal
size, wired in series, and
encapsulated between glass
and plastic ma-
218
Chapter
7: Solar Power
terial,
using a polymer resin (EVA)
as a thermal insulator. The
surface area of
the
module is typically between
0.1 and 0.5 m2.
Solar panels usually
have
two
electrical contacts, one
positive and one
negative.
Some
panels also include extra
contacts to allow the
installation of bypass
diodes
across
individual cells. Bypass
diodes protect the panel
against a
phenomenon
known as "hot-spots". A hot-spot
occurs when some of the
cells
are
in shadow while the rest of
the panel is in full sun.
Rather than producing
energy,
shaded cells behave as a
load that dissipates energy.
In this situa-
tion,
shaded cells can see a
significant
increase in temperature (about 85
to
100�C.)
Bypass diodes will prevent
hot-spots on shaded cells,
but reduce the
maximum
voltage of the panel. They
should only be used when
shading is
unavoidable.
It is a much better solution to
expose the entire panel to
full sun
whenever
possible.
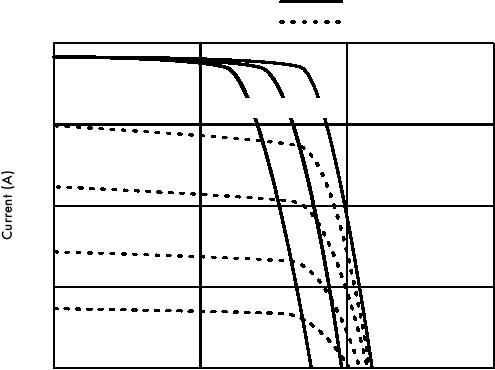
Irradiance:
1kW / m2
Cell
Temperature 25C
8
75C
50C 25C
800W
/ m2
6
600W
/ m2
4
400W
/ m2
2
200W
/ m2
0
10
20
30
Voltage
(V)
Figure
7.7: Different IV Curves.
The current (A) changes with
the irradiance, and
the
voltage
(V) changes with the
temperature.
The
electrical performance of a solar
module its represented by
the IV
char-
acteristic
curve, which
represents the current that
is provided based on
the
voltage
generated for a certain
solar radiation.
Chapter
7: Solar Power
219
The
curve represents all the
possible values of voltage-current.
The curves
depend
on two main factors: the
temperature and the solar
radiation received
by
the cells. For a given
solar cell area, the
current generated is directly
pro-
portional
to solar irradiance (G),
while the voltage reduces
slightly with an
increase
of temperature. A good regulator
will try to maximize the
amount of
energy
that a panel provides by
tracking the point that
provides maximum
power
(V x I). The maximum power
corresponds to the knee of
the IV curve.
Solar
Panel Parameters
The
main parameters that
characterize a photovoltaic panel
are:
1.
SHORT
CIRCUIT CURRENT (ISC):
the maximum current provided
by the
panel
when the connectors are
short circuited.
2.
OPEN
CIRCUIT VOLTAGE (VOC):
the maximum voltage that
the panel
provides
when the terminals are
not connected to any load
(an open cir-
cuit).
This value is normally 22 V
for panels that are
going to work in 12 V
systems,
and is directly proportional to
the number of cells
connected in
series.
3.
MAXIMUM
POWER POINT (Pmax): the point where
the power supplied
by
the panel is at maximum,
where Pmax = Imax x
Vmax. The
maximum
power
point of a panel is measured in
Watts (W) or peak Watts
(Wp).
It is
important
not to forget that in normal
conditions the panel will
not work at
peak
conditions, as the voltage of
operation is fixed by
the load or the
regulator.
Typical values of Vmax and Imax
should be a
bit smaller than
the
ISC and VOC
4.
FILL
FACTOR (FF):
the relation between the
maximum power that
the
panel
can actually provide and
the product ISC . VOC.
This gives you an
idea
of the quality of the panel
because it is an indication of the
type of IV
characteristic
curve. The closer FF is to 1,
the more power a panel
can
provide.
Common values usually are
between 0.7 and
0.8.
5.
EFFICIENCY
(h):
the ratio between the
maximum electrical power
that
the
panel can give to the
load and the power of
the solar radiation (PL)
incident
on the panel. This is
normally around 10-12%,
depending on the
type
of cells (monocrystalline,
polycrystalline, amorphous or thin
film).
Considering
the definitions of
point of maximum power and
the fill factor
we
see
that:
h
=
Pmax / PL
= FF . ISC .
VOC / PL
220
Chapter
7: Solar Power
The
values of ISC,
VOC, IPmax and
VPmax
are
provided by the manufacturer
and
refer
to standard conditions of measurement
with irradiance G = 1000
W/m2,
at
sea-level, for a temperature of
cells of Tc = 25�C.
The
panel parameters values
change for other conditions of irradiance
and tem-
perature.
Manufacturers will sometimes
include graphs or tables with
values for
conditions
different from the standard. You
should check the performance
values
at
the panel temperatures that are
likely to match your particular
installation.
Be
aware that two panels
can have the same
Wp but very different
behavior
in
different operating conditions.
When acquiring a panel, it is
important to
verify,
if possible, that their
parameters (at least,
ISC and VOC) match the
val-
ues
promised by the
manufacturer.
Panel
parameters for system
sizing
To
calculate the number of
panels required to cover a
given load, you
just
need
to know the current and
voltage at the point of
maximum power: IPmax
and
VPmax.
You
should always be aware that
the panel is not going to
perform under per-
fect
conditions as the load or
regulation system is not
always going to work
at
the
point of maximum power of
the panel. You should
assume a loss of effi-
ciency
of 5% in your calculations to compensate
for this.
Interconnection
of panels
A
solar
panel array is a
collection of solar panels
that are electrically
inter-
connected
and installed on some type
of support structure. Using a
solar
panel
array allows you to generate
greater voltage and current
than is possi-
ble
with a single solar panel.
The panels are
interconnected in such a
way
that
the voltage generated is
close to (but greater than)
the level of voltage
of
the
batteries, and that the
current generated is sufficient
to feed the equip-
ment
and to charge the
batteries.
Connecting
solar panels in series
increases the generated
voltage. Connect-
ing
panels in parallel increases
the current. The number of
panels used
should
be increased until the
amount of power generated
slightly exceeds
the
demands of your load.
It
is very important that all
of the panels in your array
are as identical as
possi-
ble.
In an array, you should use
panels of the same brand
and characteristics
because
any difference in their
operating conditions will
have a big impact on
the
health and performance of
your system. Even panels
that have identical
Chapter
7: Solar Power
221
performance
ratings will usually display
some variance in their
characteristics
due
to manufacturing processes. The
actual operating characteristics of
two
panels
from the same manufacturer
can vary by as much as
�10%.
Whenever
possible, it is a good idea to
test the real-world
performance of
individual
panels to verify their
operating characteristics before
assembling
them
into an array.
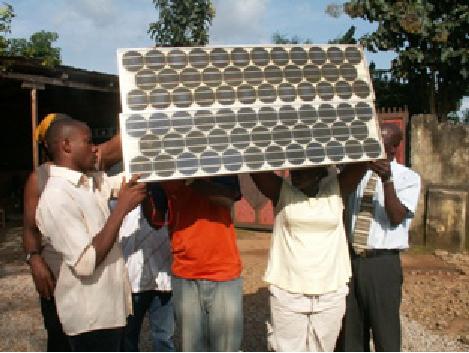
Figure
7.8: Interconnection of panels in
parallel. The voltage
remains constant
while
the
current duplicates. (Photo:
Fantsuam Foundation,
Nigeria)
How
to choose a good panel
One
obvious metric to use when
shopping for solar panels is
to compare the
ratio
of the nominal peak power
(Wp)
to the price. This will
give you a rough
idea
of the cost per Watt
for different panels. But
there are a number of
other
considerations
to keep in mind as
well.
If
you are going to install
solar panels in geographical
areas where soiling
(from
dust, sand, or grit) will
likely be a problem, consider
purchasing pan-
els
with a low affinity for
soil retention. These panels
are made of materials
that
increase the likelihood that
the panel will be
automatically cleaned by
wind
and rain.
Always
check the mechanical
construction of each panel.
Verify that the
glass
is hardened and the aluminum
frame is robust and well
built. The solar
222
Chapter
7: Solar Power
cells
inside the panel can
last for more than 20
years, but they are
very frag-
ile
and the panel must
protect them from mechanical
hazards. Look for
the
manufacturer's
quality guarantee in terms of
expected power output and
me-
chanical
construction.
Finally,
be sure that the
manufacturer provides not
only the nominal
peak
power
of the panel (Wp)
but also the variation of
the power with
irradiation
and
temperature. This is particularly
important when panels are
used in ar-
rays,
as variations in the operating
parameters can have a big
impact on the
quality
of power generated and the
useful lifetime of the
panels.
The
batter y
The
battery "hosts" a certain
reversible chemical reaction
that stores electri-
cal
energy that can later be
retrieved when needed.
Electrical energy is
transformed
into chemical energy when
the battery is being
charged, and the
reverse
happens when the battery is
discharged.
A
battery is formed by a set of
elements or cells
arranged in
series. Lead-
acid
batteries consist of two
submerged lead electrodes in an
electrolytic so-
lution
of water and sulfuric acid.
A potential difference of about 2
volts takes
place
between the electrodes,
depending on the instantaneous
value of the
charge
state of the battery. The
most common batteries in
photovoltaic solar
applications
have a nominal voltage of 12 or 24
volts. A 12 V battery
there-
fore
contains 6 cells in
series.
The
battery serves two important
purposes in a photovoltaic system: to
pro-
vide
electrical energy to the
system when energy is not
supplied by the array
of
solar panels, and to store
excess energy generated by
the panels when-
ever
that energy exceeds the
load. The battery
experiences a cyclical
proc-
ess
of charging and discharging,
depending on the presence or
absence of
sunlight.
During the hours that
there is sun, the array of
panels produces
electrical
energy. The energy that is
not consumed immediately it is
used to
charge
the battery. During the
hours of absence of sun, any
demand of elec-
trical
energy is supplied by the
battery, thereby discharging
it.
These
cycles of charge and
discharge occur whenever the
energy produced
by
the panels does not
match the energy required to
support the load.
When
there
is sufficient
sun and the load is
light, the batteries will
charge. Obvi-
ously,
the batteries will discharge
at night whenever any amount
of power is
required.
The batteries will also
discharge when the
irradiance is insufficient
to
cover the requirements of
the load (due to the
natural variation of
climato-
logical
conditions, clouds, dust,
etc.)
Chapter
7: Solar Power
223
If
the battery does not
store enough energy to meet
the demand during
peri-
ods
without sun, the system
will be exhausted and will
be unavailable for
consumption.
On the other hand, the
oversizing the system (by
adding far too
many
panels and batteries) is
expensive and inefficient.
When designing a
stand-alone
system we need to reach a
compromise between the cost
of
components
and the availability of
power from the system.
One way to do
this
is to estimate the required
number
of days of autonomy. In the
case of
a
telecommunications system, the
number of days of autonomy
depends on
its
critical function within
your network design. If the
equipment is going to
serve
as repeater and is part of
the backbone of your
network, you will
likely
want
to design your photovoltaic
system with an autonomy of up to
5-7 days.
On
the other hand, if the
solar system is responsible
for a providing energy
to
client
equipment you can probably
reduce number of days of
autonomy to
two
or three. In areas with low
irradiance, this value may
need to be in-
creased
even more. In any case,
you will always have to
find the
proper bal-
ance
between cost and
reliability.
Types
of batteries
Many
different battery technologies
exist, and are intended
for use in a vari-
ety
of different applications. The
most suitable type for
photovoltaic applica-
tions
is the stationary
battery, designed to
have a fixed
location and for
scenarios
where the power consumption
is more or less irregular.
"Station-
ary"
batteries can accommodate
deep discharge cycles, but
they are not
de-
signed
to produce high currents in
brief periods of
time.
Stationary
batteries can use an
electrolyte that is alkaline
(such as Nickel-
Cadmium)
or acidic (such as Lead-Acid).
Stationary batteries based
on
Nickel-Cadmium
are recommended for their
high reliability and
resistance
whenever
possible. Unfortunately, they
tend to be much more
expensive and
difficult
to obtain than sealed
lead-acid batteries.
In
many cases when it is
difficult to
find local,
good and cheap stationary
bat-
teries
(importing batteries is not
cheap), you will be forced
to use batteries
targeted
to the automobile
market.
Using
car batteries
Automobile
batteries are not well
suited for photovoltaic
applications as they
are
designed to provide a substantial
current for just few
seconds (when
starting
then engine) rather than
sustaining a low current for
long period of
time.
This design characteristic of
car batteries (also called
traction
batter-
ies) results in
an shortened effective life
when used in photovoltaic
systems.
Traction
batteries can be used in
small applications where low
cost is the
most
important consideration, or when
other batteries are not
available.
224
Chapter
7: Solar Power
Traction
batteries are designed for
vehicles and electric
wheelbarrows. They
are
cheaper than stationary
batteries and can serve in a
photovoltaic installa-
tion,
although they require very
frequent maintenance. These
batteries
should
never be deeply discharged,
because doing so will
greatly reduce
their
ability to hold a charge. A
truck battery should not
discharged by more
than
70% of its total capacity.
This means that you
can only use a
maximum
of
30% of a lead-acid battery's
nominal capacity before it
must be recharged.
You
can extend the life of a
lead-acid battery by using
distilled water. By
us-
ing
a densimeter or hydrometer, you
can measure the density of
the battery's
electrolyte.
A typical battery has
specific gravity of
1.28. Adding distilled
water
and
lowering the density to 1.2
can help reduce the
anode's corrosion, at a
cost
of reducing the overall
capacity of the battery. If
you adjust the density
of
battery
electrolyte, you must
use
distilled water, as tap
water or well water
will
permanently damage the
battery.
States
of charge
There
are two special state of
charge that can take
place during the
cyclic
charge
and discharge of the
battery. They should both be
avoided in order to
preserve
the useful life of the
battery.
Overcharge
Overcharge
takes
place when the battery
arrives at the limit of its
capacity. If
energy
is applied to a battery beyond
its point of maximum charge,
the electro-
lyte
begins to break down. This
produces bubbles of oxygen
and hydrogen, in
a
process is known as gasification. This
results in a loss of water,
oxidation on
the
positive electrode, and in
extreme cases, a danger of
explosion.
On
the other hand, the
presence of gas avoids the
stratification of the
acid.
After several continuous
cycles of charge and
discharge, the acid
tends
to concentrate itself at the
bottom of the battery
thereby reducing
the
effective capacity. The
process of gasification agitates
the electrolyte
and
avoids stratification.
Again,
it is necessary to find a
compromise between the
advantages (avoid-
ing
electrolyte stratification)
and the disadvantages
(losing water and
produc-
tion
of hydrogen). One solution is to
allow a slight overcharge
condition every
so
often. One typical method is
to allow a voltage of 2.35 to
2.4 Volts for
each
element
of the battery every few
days, at 25�C. The regulator
should ensure
a
periodical and controlled
overcharges.
Chapter
7: Solar Power
225
Overdischarge
In
the same way that
there is a upper limit,
there is also a lower limit
to a bat-
tery's
state of charge. Discharging
beyond that limit will
result in deterioration
of
the battery. When the
effective battery supply is
exhausted, the
regulator
prevents
any more energy from
being extracted from the
battery. When the
voltage
of the battery reaches the
minimum limit of 1.85 Volts
per cell at
25�C,
the regulator disconnects
the load from the
battery.
If
the discharge of the battery
is very deep and the
battery remains dis-
charged
for a long time, three
effects take place: the
formation of crystallized
sulfate
on the battery plates, the
loosening of the active
material on the bat-
tery
plate, and plate buckling.
The process of forming
stable sulfate
crystals
is
called hard sulfation. This
is particularly negative as it generates
big crys-
tals
that do not take part in
any chemical reaction and
can make your
battery
unusable.
Battery
Parameters
The
main parameters that
characterize a battery
are:
�
Nominal
Voltage, VNBat.
the most common value
being 12 V.
�
Nominal
Capacity, CNBat:
the maximum amount of energy
that can be ex-
tracted
from a fully charged
battery. It is expressed in Ampere-hours
(Ah)
or
Watt-hours (Wh). The amount
of energy that can be
obtained from a
battery
depends on the time in which
the extraction process takes
place.
Discharging
a battery over a long period
will yield more energy
compared
to
discharging the same battery
over a short period. The
capacity of a bat-
tery
is therefore specified at
different discharging times.
For photovoltaic
applications,
this time should be longer
than 100 hours
(C100).
�
Maximum
Depth of Discharge,
DoDmax: The depth of discharge is
the
amount
of energy extracted from a battery in a
single discharge cycle,
ex-
pressed
as a percentage. The life expectancy of a
battery depends on how
deeply
it is discharged in each cycle. The
manufacturer should provide graphs
that
relate the number of charge-discharge
cycles to the life of the
battery. As a
general
rule you should avoid
discharging a deep cycle
battery beyond
50%.
Traction batteries should
only be discharged by as little as
30%.
�
Useful
Capacity, CUBat:
It is the real (as in
usable) capacity of a battery.
It
is
equal to the product of the
nominal capacity and the
maximum DoD. For
example,
a stationary battery of nominal
capacity (C100) of 120 Ah
and
depth
of discharge of 70% has a
useful capacity of (120 x
0.7) 84 Ah.
226
Chapter
7: Solar Power
Measuring
the state of charge of the
battery
A
sealed lead-acid battery of 12 V
provides different voltages
depending on
its
state of charge. When the
battery is fully charged in an
open circuit, the
output
voltage is about 12.8 V. The
output voltage lowers
quickly to 12.6 V
when
loads are attached. As the
battery is providing constant
current during
operation,
the battery voltage reduces
linearly from 12.6 to 11.6 V
depending
on
the state of charge. A
sealed lead-acid batteries
provides 95% of its
en-
ergy
within this voltage range.
If we make the broad
assumption that a
fully
loaded
battery has a voltage of
12.6 V when "full" and
11.6 V when "empty",
we
can estimate that a battery
has discharged 70% when it
reaches a volt-
age
of 11.9 V. These values are
only a rough approximation
since they de-
pend
on the life and quality of
the battery, the
temperature, etc.
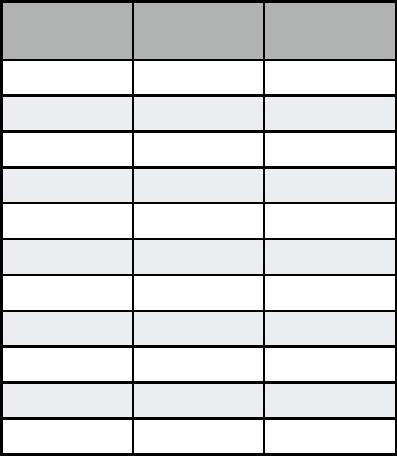
State
of Charge
12V
Battery
Volts
per Cell
Voltage
100%
12.7
2.12
90%
12.5
2.08
80%
12.42
2.07
70%
12.32
2.05
60%
12.2
2.03
50%
12.06
2.01
40%
11.9
1.98
30%
11.75
1.96
20%
11.58
1.93
10%
11.31
1.89
0%
10.5
1.75
According
to this table, and
considering that a truck
battery should not be
discharged
more than 20% to 30%, we
can determine that the
useful capac-
ity
of a truck 170 Ah truck
battery is 34 Ah (20%) to 51 Ah (30%).
Using the
same
table, we find that we
should program the regulator
to prevent the bat-
tery
from discharging below 12.3
V.
Chapter
7: Solar Power
227
Battery
and regulator protection
Thermomagnetic
circuit breakers or one time
fuses must be used to
protect
the
batteries and the
installation from short
circuit and malfunctions.
There
are
two types of fuses:
slow
blow, and
quick
blow. Slow
blow fuses should
be
used with inductive or
capacitive loads where a
high current can occur
at
power
up. Slow blow fuses
will allow a higher current
than their rating to
pass
for
a short time. Quick blow
fuses will immediately blow
if the current flowing
through
them is higher than their
rating.
The
regulator is connected to the
battery and the loads, so
two different kinds
of
protection needs to be considered.
One fuse should be placed
between
the
battery and the regulator,
to protect the battery from
short-circuit in case
of
regulator failure. A second
fuse is needed to protect
the regulator from
ex-
cessive
load current. This second
fuse is normally integrated
into the regula-
tor
itself.
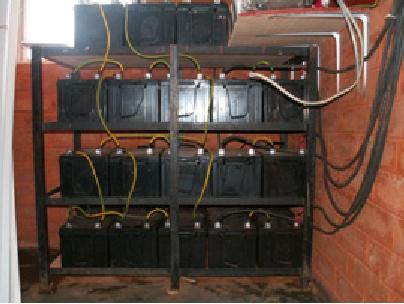
Figure
7.9: A battery bank of 3600
Ah, currents reach levels of
45 A during charging
Every
fuse is rated with a maximum
current and a maximum usable
voltage.
The
maximum current of the fuse
should be 20% bigger than
the maximum
current
expected. Even if the
batteries carry a low
voltage, a short circuit
can
lead
to a very high current which
can easily reach several
hundred amperes.
Large
currents can cause fire,
damage the equipment and
batteries, and
possibly
cause electric shock to a
human body
If
a fuse breaks, never replace
a fuse with a wire or a
higher rated fuse.
First
determine
the cause of the problem,
then replace the fuse
with another one
which
has the same
characteristics.
228
Chapter
7: Solar Power
Temperature
effects
The
ambient temperature has
several important effects on
the characteristics
of
a battery:
�
The nominal capacity of a
battery (that the
manufacturer usually gives
for
25�C)
increases with temperature at
the rate of about 1%/�C.
But if the
temperature
is too high, the chemical
reaction that takes place in
the bat-
tery
accelerates, which can cause
the same type of oxidation
that takes
places
during overcharging. This
will obviously reduce the
life expectancy
of
battery. This problem can be
compensated partially in car
batteries by
using
a low density of dissolution (a
specific gravity of
1.25 when the
bat-
tery
is totally charged).
�
As the temperature is reduced,
the useful life of the
battery increases.
But
if the temperature is too
low, you run the
the risk of freezing the
elec-
trolyte.
The freezing temperature
depends on the density of
the solution,
which
is also related to the state
of charge of the battery.
The lower the
density,
the greater the risk of
freezing. In areas of low
temperatures, you
should
avoid deeply discharging the
batteries (that is,
DoDmax is effec-
tively
reduced.)
�
The temperature also changes
the relation between voltage
and charge. It
is
preferable to use a regulator
which adjusts the low
voltage disconnect
and
reconnect parameters according to
temperature. The
temperature
sensor
of the regulator should be fixed
to the battery using tape or
some
other
simple method.
�
In hot areas it is important to
keep the batteries as cool
as possible. The
batteries
must be stored in a shaded
area and never get
direct sunlight. It's
also
desirable to place the
batteries on a small support to
allow air to flow
under
them, thus increase the
cooling.
How
to choose a good battery
Choosing
a good battery can be very
challenging in developing regions.
High
capacity
batteries are heavy, bulky
and expensive to import. A
200 Ah battery
weights
around 50 kg (120 pounds)
and it can not be
transported as hand
luggage.
If you want long-life (as in
> 5 years) and maintenance
free batter-
ies
be ready to pay the
price.
A
good battery should always
come with its technical
specifications,
including
the
capacity at different discharge
rates (C20, C100), operating
temperature,
cut-off
voltage points, and
requirements for
chargers.
The
batteries must be free of
cracks, liquid spillage or
any sign of damage,
and
battery terminals should be
free of corrosion. As laboratory
tests are
Chapter
7: Solar Power
229
necessary
to obtain complete data
about real capacity and
aging, expect
lots
of low quality batteries
(including fakes) in the
local markets. A
typical
price
(not including transport and
import tax) is $3-4 USD
per Ah for 12 V
lead-acid
batteries.
Life
expectancy versus number of
cycles
Batteries
are the only component of a
solar system that should be
amortized
over
a short period and regularly
replaced. You can increase
the useful life-
time
of a battery by reducing the
depth of discharge per
cycle. Even deep
cycle
batteries will have an
increased battery life if
the the number of
deep
discharge
(>30%) cycles is
reduced.
If
you completely discharge the
battery every day, you
will typically need
to
change
it after less than one
year. If you use only
1/3 of the capacity the
bat-
tery,
it can last more than 3
years. It can be cheaper to
buy a battery with 3
times
the capacity than to change
the battery every
year.
The
power charge regulator
The
power charge regulator is
also known as charge
controller, voltage
regu-
lator,
charge-discharge controller or
charge-discharge and load
controller.
The
regulator sits between the
array of panels, the
batteries, and your
equipment
or loads.
Remember
that the voltage of a
battery, although always
close to 2 V per
cell,
varies according to its
state of charge. By monitoring
the voltage of the
battery,
the regulator prevents
overcharging or overdischarging.
Regulators
used in solar applications
should be connected in series:
they
disconnect
the array of panels from
the battery to avoid
overcharging, and
they
disconnect the battery from
the load to avoid
overdischarging. The
connection
and disconnection is done by
means of switches which can
be
of
two types: electromechanical
(relays) or solid state
(bipolar transistor,
MOSFET).
Regulators should never be
connected in parallel.
In
order to protect the battery
from gasification, the
switch opens the
charging
circuit when the voltage in
the battery reaches its
high voltage
disconnect
(HVD) or cut-off set point.
The low voltage disconnect
(LVD)
prevents
the battery from
overdischarging by disconnecting or
shedding
the
load. To prevent continuous
connections and disconnections
the regu-
lator
will not connect back
the loads until the
battery reaches a low
recon-
nect
voltage (LRV).
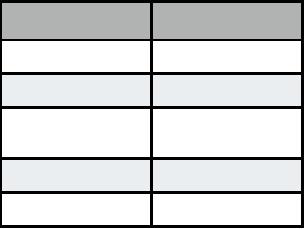
230
Chapter
7: Solar Power
Typical
values for a 12 V lead-acid
battery are:
Voltage
Point
Voltage
LVD
11.5
LRV
12.6
Constant
Voltage
14.3
Regulated
Equalization
14.6
HVD
15.5
The
most modern regulators are also
able to automatically disconnect
the panels
during
the night to avoid discharging of the
battery. They can also
periodically
overcharge
the battery to improve their life, and
they may use a
mechanism
known
as pulse width modulation
(PWM) to prevent excessive
gassing.
As
the peak power operating
point of the array of panels
will vary with
tem-
perature
and solar illumination, new
regulators are capable of
constantly
tracking
the maximum point of power
of the solar array. This
feature is known
as
maximum power point tracking
(MPPT).
Regulator
Parameters
When
selecting a regulator for
your system, you should at
least know the
operating
voltage and
the maximum
current that
the regulator can
handle.
The
operating Voltage will be
12, 24, or 48 V. The maximum
current must be
20%
bigger than the current
provided by the array of
panels connected to
the
regulator.
Other
features and data of
interest include:
�
Specific values
for LVD, LRV and
HVD.
�
Support for temperature
compensation. The voltage
that indicates the
state
of
charge of the battery vary
with temperature. For that
reason some regu-
lators
are able to measure the
battery temperature and
correct the different
cut-off
and reconnection
values.
�
Instrumentation and gauges.
The most common instruments
measure the
voltage
of the panels and batteries,
the state of charge (SoC) or Depth of
Dis-
charge
(DoD). Some regulators include
special alarms to indicate that
the
panels
or loads have been disconnected,
LVD or HVD has been reached,
etc.
Chapter
7: Solar Power
231
Conver
ters
The
regulator provides DC power at a
specific voltage. Converters
and invert-
ers
are used to adjust the
voltage to match the
requirements of your
load.
DC/DC
Converters
DC/DC
converters transform a continuous
voltage to another
continuous
voltage
of a different value. There
are two conversion methods
which can be
used
to adapt the voltage from
the batteries: linear
conversion and
switch-
ing
conversion.
Linear
conversion lowers the
voltage from the batteries
by converting excess
energy
to heat. This method is very
simple but is obviously
inefficient.
Switching
conversion generally uses a
magnetic component to
temporarily
store
the energy and transform it
to another voltage. The
resulting voltage
can
be greater, less than, or
the inverse (negative) of
the input voltage.
The
efficiency
of a linear regulator decreases as
the difference between
the
input
voltage and the output
voltage increases. For
example, if we want to
convert
from 12 V to 6 V, the linear
regulator will have an efficiency
of only
50%.
A standard switching regulator
has an efficiency of at
least 80%.
DC/AC
Converter or Inverter
Inverters
are used when your
equipment requires AC power.
Inverters chop
and
invert the DC current to
generate a square wave that
is later filtered
to
approximate
a sine wave and eliminate
undesired harmonics. Very
few
inverters
actually supply a pure sine
wave as output. Most models
available
on
the market produce what is
known as "modified sine
wave", as their volt-
age
output is not a pure
sinusoid. When it comes to efficiency,
modified
sine
wave
inverters perform better
than pure sinusoidal
inverters.
Be
aware that not all
the equipment will accept a
modified sine
wave as volt-
age
input. Most commonly, some
laser printers will not
work with a modified
sine
wave inverter. Motors will
work, but they may
consume more power
than
if
they are fed with a
pure sine wave. In addition,
DC power supplies tend
to
warm
up more, and audio
amplifiers
can emit a buzzing
sound.
Aside
from the type of waveform,
some important features of
inverters include:
�
Reliability
in the presence of surges. Inverters
have two power
ratings:
one
for continuous power, and a
higher rating for peak
power. They are
capable
of providing the peak power
for a very short amount of
time, as
when
starting a motor. The
inverter should also be able
to safely interrupt
232
Chapter
7: Solar Power
itself
(with a circuit breaker or
fuse) in the event of a
short circuit, or if
the
requested
power is too high.
�
Conversion
efficiency.
Inverters
are most efficient
when providing 50% to
90%
of their continuous power
rating. You should select an
inverter that
most
closely matches your load
requirements. The manufacturer
usually
provides
the performance of the
inverter at 70% of its
nominal power.
�
Battery
charging. Many
inverters also incorporate
the inverse function:
the
possibility of charging batteries in
the presence of an alternative
source
of
current (grid, generator,
etc). This type of inverter
is known as a charger/
inverter.
�
Automatic
fall-over. Some
inverters can switch
automatically between
different
sources of power (grid,
generator, solar) depending on
what is
available.
When
using telecommunication equipment, it is
best to avoid the use of
DC/
AC
converters and feed them
directly from a DC source.
Most communica-
tions
equipment can accept a wide
range of input
voltage.
Equipment
or load
It
should be obvious that as
power requirements increase,
the expense of the
photovoltaic
system also increases. It is
therefore critical to match
the size of
the
system as closely as possible to
the expected load. When
designing the
system
you must first
make a realistic estimate of
the maximum consump-
tion.
Once the installation is in
place, the established
maximum consumption
must
be respected in order to avoid
frequent power
failures.
Home
Appliances
The
use of photovoltaic solar
energy is not recommended
for heat-exchange
applications
(electrical heating, refrigerators,
toasters, etc.) Whenever
possi-
ble,
energy should be used
sparingly using low power
appliances.
Here
are some points to keep in
mind when choosing
appropriate equipment
for
use with a solar
system:
�
The photovoltaic solar
energy is suitable for
illumination. In this case,
the
use
of halogen light bulbs or fluorescent
lamps is mandatory.
Although
these
lamps are more expensive,
they have much better
energy efficiency
than
incandescent light bulbs.
LED lamps are also a
good choice as they
are
very efficient
and are fed with
DC.
�
It is possible to use photovoltaic
power for appliances that
require low and
constant
consumption (as in a typical
case, the TV). Smaller
televisions
Chapter
7: Solar Power
233
use
less power than larger
televisions. Also consider
that a black-and-white
TV
consumes about half the
power of a color TV.
�
Photovoltaic solar energy is
not recommended for any
application that
transforms
energy into heat (thermal
energy). Use solar heating
or butane
as
alternative.
�
Conventional automatic washing
machines will work, but
you should avoid
the
use of any washing programs
that include centrifuged
water heating.
�
If you must use a
refrigerators, it should consume as
little power as
possi-
ble.
There are specialized
refrigerators that work in
DC, although their
con-
sumption
can be quite high (around
1000 Wh/day).
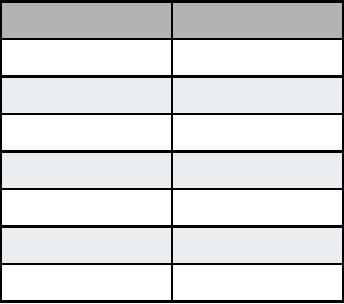
The
estimation of total consumption is a
fundamental step in sizing
your solar
system.
Here is a table that gives
you a general idea of the
power consump-
tion
that you can expect
from different
appliances.
Equipment
Consumption
(Watts)
Portable
computer
30-50
Low
power lamp
6-10
WRAP
router (one radio)
4-10
VSAT
modem
15-30
PC
(without LCD)
20-30
PC
(with LCD)
200-300
Network
Switch (16 port)
6-8
Wireless
telecommunications equipment
Saving
power by choosing the right
gear saves a lot of money
and trouble.
For
example , a long distance
link doesn't necessarily
need a strong amplifier
that
draws a lot of power. A
Wi-Fi card with good
receiver sensitivity and
a
fresnel
zone that is at least 60%
clear will work better
than an amplifier,
and
save
power consumption as well. A
well known saying of radio
amateurs ap-
plies
here, too: The best
amplifier is a good
antenna. Further measures
to
reduce
power consumption include
throttling the CPU speed,
reducing
transmit
power to the minimum value
that is necessary to provide a
stable
234
Chapter
7: Solar Power
link,
increasing the length of
beacon intervals, and
switching the system
off
during
times it is not
needed.
Most
autonomous solar systems
work at 12 or 24 volts. Preferably, a
wireless
device
that runs on DC voltage
should be used, operating at
the 12 Volts that
most
lead acid batteries provide.
Transforming the voltage
provided by the
battery
to AC or using a voltage at the
input of the access point
different from
the
voltage of the battery will
cause unnecessary energy
loss. A router or
access
point that accepts 8-20
Volts DC is perfect.
Most
cheap access points have a
switched mode voltage
regulator inside
and
will work through such a
voltage range without
modification or
becoming
hot
(even if the device was
shipped with a 5 or 12 Volt
power supply).
WARNING:
Operating your access point
with a power supply other
than the
one
provided by your manufacturer
will certainly void any
warranty, and may
cause
damage to your equipment.
While the following
technique will
typically
work
as described, remember that
should you attempt it,
you do so at your
own
risk.
Open
your access point and
look near the DC input
for two relatively big
ca-
pacitors
and an inductor (a ferrite
toroid with copper wire
wrapped around it).
If
they are present then
the device has a switched
mode input, and
the
maximum
input voltage should be
somewhat below the voltage
printed on the
capacitors.
Usually the rating of these
capacitors is 16 or 25 volts. Be
aware
that
an unregulated power supply
has a ripple and may
feed a much higher
voltage
into your access point
than the typical voltage
printed on it may
sug-
gest.
So, connecting an unregulated
power supply with 24 Volts
to a device
with
25 Volt-capacitors is not a good
idea. Of course, opening
your device
will
void any existing warranty.
Do not try to operate an
access point at
higher
voltage
if it doesn't have a switched
mode regulator. It will get
hot, malfunc-
tion,
or burn.
Equipment
based on traditional Intel
x86 CPUs are power
hungry in compari-
son
with RISC-based architectures as
ARM or MIPS. One of the
boards with
lowest
power consumptions is the
Soekris platform that uses
an AMD
ElanSC520
processor. Another alternative to
AMD (ElanSC or Geode
SC1100)
is the use of equipment with
MIPS processors. MIPS
processors
have
a better performance than an
AMD Geode at the price of
consuming
between
20-30% of more
energy.
The
popular Linksys WRT54G runs
at any voltage between 5 and
20 volts
DC
and draws about 6 Watts,
but it has an Ethernet
switch onboard.
Having
a
switch is of course nice and
handy - but it draws extra
power. Linksys also
offers
a Wi-Fi access point called
WAP54G that draws only 3
Watts and can
run
OpenWRT and Freifunk firmware.
The 4G Systems Accesscube
draws
Chapter
7: Solar Power
235
about
6 Watts when equipped with a
single WiFi interface. If
802.11b is suffi-
cient,
mini-PCI cards with the
Orinoco chipset perform very
well while draw-
ing
a minimum amount of
power.
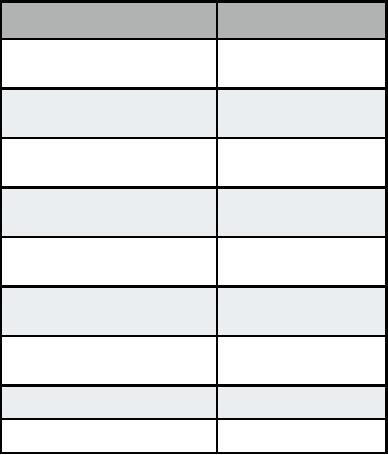
Equipment
Consumption
(Watts)
Linksys
WRT54G
6
(BCM2050
radio)
Linksys
WAP54G
3
(BCM2050
radio)
Orinoco
WavePoint II ROR
15
(30mW
radio)
Soekris
net4511
1.8
(no
radio)
PC
Engines WRAP.1E-1
2.04
(no
radio)
Mikrotik
Routerboard 532
2.3
(no
radio)
Inhand
ELF3
1.53
(no
radio)
Senao
250mW radio
3
Ubiquiti
400mW radio
6
The
amount of power required by
wireless equipment depends
not only on
the
architecture but on the
number of network interfaces,
radios, type of
memory/storage
and traffic. As a
general rule, a wireless
board of low con-
sumption
consumes 2 to 3 W, and a 200 mW
radio card consumes as
much
as
3 W. High power cards (such
as the 400 mW Ubiquity)
consume around 6
W.
A repeating station with two
radios can range between 8
and 10 W.
Although
the standard IEEE 802.11
incorporates a power saving
mode (PS)
mechanism,
its benefit is not as
good as you might hope.
The main mecha-
nism
for energy saving is to
allow stations to periodically
put their wireless
cards
to "sleep" by means of a timing
circuit. When the wireless
card wakes
up
it verifies if a beacon
exists, indicating pending
traffic. The
energy saving
therefore
only takes place in the
client side, as the access
point always
needs
to remain awake to send
beacons and store
traffic for
the clients.
Power
saving mode may be
incompatible between implementations
from
different
manufacturers, which can
cause unstable wireless
connections. It is
236
Chapter
7: Solar Power
nearly
always best to leave power
saving mode disabled on all
equipment, as
the
difficulties
created will likely outweigh
the meager amount of
saved
power.
Selecting
the voltage
Most
low power stand-alone
systems use 12 V battery
power as that is the
most
common operational voltage in
sealed lead-acid batteries.
When de-
signing
a wireless communication system
you need to take into
consideration
the
most efficient
voltage of operation of your
equipment. While the
input
voltage
can accept a wide range of
values, you need to ensure
that the over-
all
power consumption of the
system is minimal.
Wiring
An
important component of the
installation is the wiring, as
proper wiring
will
ensure efficient energy
transfer. Some good
practices that you
should
consider
include:
�
Use a screw to fasten the
cable to the battery
terminal. Loose
connections
will
waste power.
�
Spread Vaseline or mineral
jelly on the battery
terminals. Corroded
connec-
tion
have an increased resistance,
resulting in loss.
�
For low currents (<10 A)
consider the use of Faston
or Anderson power-
pole
connectors.
For
bigger currents, use
metallic ring lugs.
Wire
size is normally given in
American Wire Gauge (AWG).
During your cal-
culations
you will need to convert
between AWG and mm2 to
estimate cable
resistance.
For example, an AWG #6 cable
has a diameter of 4.11 mm
and
can
handle up to 55 A. A conversion chart,
including an estimate of
resis-
tance
and current carrying
capacity, is available in Appendix
D.
Keep in
mind
that the current carrying
capacity can also vary
depending on the type
of
insulation and application.
When in doubt, consult the
manufacturer for
more
information.
Orientation
of the panels
Most
of the energy coming from
the sun arrives in straight
line. The solar
module
will capture more energy if
it is "facing" the sun,
perpendicular to the
straight
line between the position of
the installation and the
sun. Of course,
the
sun's position is constantly
changing relative to the
earth, so we need to
find an optimal
position for our panels.
The orientation of the
panels is de-
termined
by two angles, the
azimuth
a and
the inclination
or
elevation
�.
The
azimuth is the angle that
measures the deviation with
respect to the
Chapter
7: Solar Power
237
south
in the northern hemisphere,
and with respect to the
north in the south-
ern
hemisphere. The inclination is
the angle formed by the
surface of the
module
and the horizontal
plane.
Azimuth
You
should have the module
turned towards the
terrestrial equator
(facing
south
in the northern hemisphere,
and north in the southern)
so that during
the
day the panel catches
the greatest possible amount
of radiation (a = 0).
It
is very important that no
part of the panels are
ever under shade!.
Study
the
elements that surround the
panel array (trees,
buildings, walls,
other
panels,
etc.) to be sure that they
will not cast a shadow on
the panels at any
time
of the day or year. It is
acceptable to turn the
panels �20� towards
the
east
or the west if needed (a =
�20�).
Inclination
Once
you have fixed
the azimuth, the parameter
that is key in our
calcula-
tions
is the inclination of the
panel, which we will express
as the angle beta
(�).
The maximum height that
the sun reaches every
day will vary, with
the
maximum
on the day of the summer
solstice and the minimum on
the winter
solstice.
Ideally, the panels should
track this variation, but
this is usually not
possible
for cost reasons.
In
installations with telecommunications
equipment it is normal to install
the
panels
at a fixed inclination. In most
telecommunications scenarios the
energy
demands
of the system are constant
throughout the year.
Providing for suffi-
cient
power during the "worst
month" will work well
for the rest of the
year.
The
value of � should maximize
the ratio between the
offer and the
demand
of
energy.
�
For installations with
consistent (or nearly consistent)
consumption through-
out
the year, it is preferable to
optimize the installation to
capture the maxi-
mum
radiation during "the
winter" months. You should
use the absolute
value
of
the latitude of the place
(angle F) increased by 10� (� = |
F |
+ 10
�).
�
For installations with less
consumptions during winter,
the value of the
lati-
tude
of the place can be used as
the solar panel inclination.
This way the
system
is optimized for the months
of spring and autumn (� = | F |).
�
For installations that are only used during summer,
you should use the absolute
value
of the latitude of the place
(angle F) decreased by 10� (� = | F
| -
10�).
The
inclination of the panel
should never be less than
15� to avoid the
accu-
mulation
of dust and/or humidity on
the panel. In areas where
snow and ice
238
Chapter
7: Solar Power
occur,
it is very important to protect
the panels and to incline
them an angle
of
65� or greater.
If
there is a considerable increase in consumption during
the summer, you
might
consider
arranging for two fixed inclinations, one
position for the months of
summer
and another for the months of
winter. This would require
special support
structures
and a regular schedule for
changing the position of the
panels.
How
to size your photovoltaic
system
When
choosing equipment to meet
your power needs, you
will need to de-
termine
the following, at a
minimum:
�
The number and type of
solar panels required to
capture enough solar
en-
ergy
to support your load.
�
The minimum capacity of the
battery. The battery will
need to store enough
energy
to provide power at night
and through days with
little sun, and
will
determine
your number of days of
autonomy.
�
The characteristics of all
other components (the
regulator, wiring,
etc.)
needed
to support the amount of
power generated and
stored.
System
sizing calculations are
important, because unless
the system com-
ponents
are balanced, energy (and
ultimately, money) is wasted.
For exam-
ple,
if we install more solar
panels to produce more
energy, the batteries
should
have enough capacity to
store the additional energy
produced. If the
bank
of batteries is too small
and the load is not
using the energy as it
is
generated,
then energy must be thrown
away. A regulator of a smaller
am-
perage
than needed, or one single
cable that is too small,
can be a cause of
failure
(or even fire)
and render the installation
unusable.
Never
forget that the ability of
the photovoltaic energy to
produce and store
electrical
energy is limited. Accidentally
leaving on a light bulb
during the
day
can easily drain your
reserves before nighttime, at
which point no addi-
tional
power will be available. The
availability of "fuel" for
photovoltaic sys-
tems
(i.e. solar radiation) can
be difficult to predict. In fact, it is
never possi-
ble
to be absolutely sure that a
standalone system is going to be
able to
provide
the necessary energy at any
particular moment. Solar
systems are
designed
for a certain consumption,
and if the user exceeds
the planned
limits
the provision of energy will
fail.
The
design method that we
propose consists of considering
the energy re-
quirements,
and based on them to
calculate a system that
works for the
maximum
amount of time so it is as reliable as
possible. Of course, if
more
Chapter
7: Solar Power
239
panels
and batteries are installed,
more energy will be able to
be collected
and
stored. This increase of
reliability will also have
an increase in cost.
In
some photovoltaic installations
(such as the provision of
energy for tele-
communications
equipment on a network backbone)
the reliability factor
is
more
important that the cost. In
a client installation, low
cost is likely going
to
be
a the most important factor.
Finding a balance between
cost and reliability
is
not a easy task, but
whatever your situation, you
should be able to
deter-
mine
what it is expected from
your design choices, and at
what price.
The
method we will use for
sizing the system is known
as the method
of
the
worst month. We simply
calculate the dimensions of
the standalone
system
so it will work in the month
in which the demand for
energy is
greatest
with respect to the
available solar energy. It is
the worst month of
the
year, as this month with
have the largest ratio of
demanded energy to
available
energy.
Using
this method, reliability
is taken
into consideration by fixing
the maxi-
mum
number of days that the
system can work without
receiving solar
radia-
tion
(that is, when all
consumption is made solely at
the expense of the
en-
ergy
stored in the battery.) This
is known as the maximum
number of days
of
autonomy (N),
and can be thought of as the
number of consecutive
cloudy
days when the panels do
not collect any
significant
amount of energy.
When
choosing N, it is necessary to know
the climatology of the
place, as well
as
the economic and social
relevance of the installation.
Will it be used to illu-
minate
houses, a hospital, a factory,
for a radio link, or for
some other applica-
tion?
Remember that as N increases, so
does the investment in
equipment
and
maintenance. It is also important to
evaluate all possible
logistical costs of
equipment
replacement. It is not the
same to change a discharged
battery from
an
installation in the middle of a
city versus one at the
top a telecommunica-
tion
tower that is several hours
or days of walking
distance.
Fixing
the value of N it is not an
easy task as there are
many factors in-
volved,
and many of them cannot be
evaluated easily. Your
experience will
play
an important role in this
part of the system sizing.
One commonly used
value
for critical telecommunications
equipment is N = 5, whereas for
low
cost
client equipment it is possible to
reduce the autonomy to N =
3.
In
Appendix
E,
we have included several
tables that will facilitate
the collec-
tion
of required data for sizing
the system. The rest of
this chapter will
explain
in
detail what information you
need to collect or estimate
and how to use
the
method
of the "worst month".
240
Chapter
7: Solar Power
Data
to collect
�
Latitude
of the installation. Remember to
use a positive sign in
the
northern
hemisphere and negative in
the south.
�
Solar
radiation data. For
the method of the "worst
month" it is enough to
know
just twelve values, one
for every month. The
twelve numbers are
the
monthly
average values of daily
global irradiation on horizontal
plane
(Gdm(0), in kWh/m2 per day). The
monthly value is the sum of
the values of
global
irradiation for every day of
the month, divided by the
number of days
of
the month.
If
you have the data in
Joules (J), you can
apply the following
conversion:
10-7 kWh
1
J = 2.78
The
irradiation data Gdm(0) of many places of
the world is gathered in
tables
and
databases. You should check
for this information from a
weather station
close
to your implementation site,
but do not be surprised if
you cannot find
the
data in electronic format. It is a
good idea to ask companies
that install
photovoltaic
systems in the region, as
their experience can be of
great value.
Do
not confuse "sun hours"
with the number of "peak
sun hours". The
number
of
peak sun hours has
nothing to do with the
number of hours without
clouds,
but
refers to the amount of
daily irradiation. A day of 5
hours of sun without
clouds
does not necessary have
those hours when the
sun is at its zenith.
A
peak sun hour is a
normalized value of solar
radiation of 1000 W/m2 at
25
C.
So when we refer to 5 peak
sun hours, this implies a
daily solar radiation
of
5000 W/m2.
Electrical
characteristics of system
components
The
electrical characteristics of the
components of your system
should be
provided
by the manufacturer. It is advisable to
make your our own
meas-
urements
to check for any deviation
from the nominal values.
Unfortunately,
deviation
from promised values can be
large and should be
expected.
These
are the minimum values
that you need to gather
before starting your
system
sizing:
Panels
You
need to know the voltage
VPmax and the current
IPmax
at the
point of
maximum
power in standard
conditions.
Chapter
7: Solar Power
241
Batteries
Nominal
capacity (for 100 hours
discharge) CNBat , operational voltage VNBat ,
and
either the maximum depth of
discharge DoDmax or useful capacity CUBat .
You
also need to know the
type of battery that you
plan to use, whether
sealed
lead-acid, gel, AGM,
modified traction
etc. The type of battery is
im-
portant
when deciding the cut-off
points in the
regulator.
Regulator
You
need to know the nominal
voltage VNReg, and the maximum
current that
can
operate ImaxReg.
DC/AC
Converter/Inverter
If
you are going to use a converter,
you need to know the
nominal voltage VNConv,
instantaneous
power PIConv and performance at 70% of
maximum load H70.
Equipment
or load
It
is necessary to know the
nominal voltage VNC and the nominal
power of
operation
PC for every piece of
equipment powered by the
system.
In
order to know the total
energy that our installation
is going to consume, it
is
also very important to
consider the average time
each load will be used.
Is
it
constant? Or will it be used
daily, weekly, monthly or
annually? Consider
any
changes in the usage that
might impact the amount of
energy needed
(seasonal
usage, training or school
periods, etc.)
Other
variables
Aside
from the electrical
characteristics of the components
and load, it is
necessary
to decide on two more pieces
of information before being
able to
size
a photovoltaic system. These
two decisions are the
required number of
days
of autonomy and the
operational voltage of the
system.
N,
number of days of
autonomy
You
need to decide on a value
for N that will balance
meteorological condi-
tions
with the type of
installation and overall
costs. It is impossible to give
a
concrete
value of N that is valid for
every installation, but the
next table gives
some
recommended values. Take
these values as a rough
approximation,
and
consult with an experienced
designer to reach a final
decision.
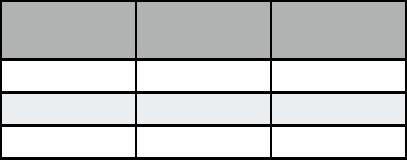
242
Chapter
7: Solar Power
Available
Domestic
Critical
Sunlight
Installation
Installation
Very
cloudy
5
10
Variable
4
8
Sunny
3
6
VN,
nominal voltage of the
installation
The
components of your system
need to be chosen to operate at a
nominal
voltage
VN.
This voltage is usually 12 or 24
Volts for small systems,
and if the
total
power of consumption surpasses 3
kW, the voltage will be 48
V. The
selection
of VN is
not arbitrary, and depends
on the availability of
equipment.
�
If the equipment allows it,
try to fix the
nominal voltage to 12 or 24 V.
Many
wireless
communications boards accept a
wide range of input voltage
and
can
be used without a
converter.
�
If you need to power several
types of equipment that work
at different
nominal
voltages, calculate the
voltage that minimizes the
overall power
consumption
including the losses for
power conversion in DC/DC
and DC/
AC
converters.
Procedure
of calculation
There
are three main steps
that need to be followed to
calculate the proper
size
of a system:
1.
Calculate
the available solar energy (the
offer). Based on
statistical
data
of solar radiation, and the
orientation and the optimal
inclination of
the
solar panels, we calculate
the solar energy available.
The estimation
of
solar energy available is
done in monthly intervals,
reducing the statis-
tical
data to 12 values. This
estimation is a good compromise
between
precision
and simplicity.
2.
Estimate
the required electrical energy (the
demand). Record
the
power
consumption characteristics of the
equipment chosen as well
as
estimated
usage. Then calculate the
electrical energy required on
a
monthly
basis. You should consider
the expected fluctuations of
usage
due
to the variations between
winter and summer, the
rainy period / dry
season,
school / vacation periods,
etc. The result will be 12
values of
energy
demand, one for each
month of the year.
Chapter
7: Solar Power
243
3.
Calculate
the ideal system size (the
result). With
the data from
the
"worst
month", when the relation
between the solar demanded
energy
and
the energy available is
greatest, we calculate:
�
The current that the
array of panels needs to
provide, which will
determine
the minimum number of
panels.
�
The necessary energy storage
capacity to cover the
minimum
number
of days of autonomy, which
will determine the
required
number
of batteries.
�
The required electrical
characteristics of the
regulator.
�
The length and the
necessary sections of cables
for the electrical
connections.
Required
current in the worst
month
For
each month you need to
calculate the value of
Im,
which is the maximum
daily
current that an array of
panels operating at nominal
voltage of VN needs
to
provide, in a day with a
irradiation of Gdm for month "m",
for panels with an
inclination
of � degrees..
The
Im(WORST
MONTH) will be the largest
value of Im,
and the system
sizing
is
based on the data of that
worth month. The
calculations of Gdm(�) for a cer-
tain
place can be made based on
Gdm(0) using computer
software such as
PVSYST
(http://www.pvsyst.com/) or PVSOL
(http://www.solardesign.co.uk/).
Due
to losses in the regulator
and batteries, and due to
the fact that the
pan-
els
do not always work at the
point of maximum power, the
required current
ImMAX is
calculated as:
ImMAX =
1.21 Im (WORST MONTH)
Once
you have determined the
worst month, the value of
ImMAX, and the
total
energy
that you require ETOTAL(WORST
MONTH) you can proceed to
the final
calculations.
ETOTAL is the sum of all DC
and AC loads, in Watts. To
calculate
ETOTAL see
Appendix
E.
Number
of panels
By
combining solar panels in
series and parallel, we can
obtain the desired
voltage
and current. When panels
are connected in series, the
total voltage is
equal
to the sum of the individual
voltages of each module,
while the current
remains
unchanged. When connecting
panels in parallel, the
currents are
244
Chapter
7: Solar Power
summed
together while the voltage
remains unchanged. It is very
important,
to
use panels of nearly
identical characteristics when
building an array.
You
should try to acquire panels
with VPmax a bit bigger than
the nominal volt-
age
of the system (12, 24 or 48
V). Remember that you
need to provide a
few
volts more than the
nominal voltage of the
battery in order to charge
it. If
it
is not possible to find a single
panel that satisfies your
requirements, you
need
to connect several panels in
series to reach your desired
voltage. The
number
of panels in series Nps is equal to the nominal
voltage of the system
divided
by the voltage of a single
panel, rounded up to the
nearest integer.
Nps =
VN / VPmax
In
order to calculate the
number of panels in parallel
(Npp), you need to
divide
the
ImMAX by the current of a single
panel at the point of
maximum power
Ipmax,
rounded up to the nearest
integer.
Npp =
ImMAX
/ IPmax
The
total number of panels is
the result of multiplying
the number of panels
in
series
(to set the voltage) by
the number of panels in
parallel (to set the
cur-
rent).
NTOTAL =
Nps x Npp
Capacity
of the battery or
accumulator
The
battery determines the
overall voltage of the
system and needs to
have
enough
capacity to provide energy to
the load when there is
not enough
solar
radiation.
To
estimate the capacity of our
battery, we first
calculate the required
energy
capacity
of our system (necessary
capacity, CNEC). The necessary
capacity
depends
on the energy available
during the "worst month"
and the desired
number
of days of autonomy
(N).
CNEC (Ah)=
ETOTAL(WORST
MONTH)(Wh) / VN(V) x
N
The
nominal capacity of the battery
CNOM needs to be bigger than
the CNEC as
we
cannot fully discharge a battery. To
calculate the size of the
battery we need
to
consider the maximum depth
of discharge (DoD) that the
battery allows:
CNOM(Ah)
= CNEC(Ah)
/ DoDMAX
Chapter
7: Solar Power
245
In
order to calculate the
number of batteries in series
(Nbs),
we divide the
nominal
voltage of our installation
(VN)
by the nominal voltage of a
single
battery
(VNBat):
Nbs =
VN / VNBat
Regulator
One
important warning: always
use regulators in series,
never in parallel. If
your
regulator does not support
the current required by your
system, you will
need
to buy a new regulator with
a larger working
current.
For
security reasons, a regulator
needs to be able to operate
with a current
ImaxReg at
least 20% greater than
the maximum intensity that
is provided by
the
array of panels:
ImaxReg =
1.2 Npp IPMax
DC/AC
Inverter
The
total energy needed for
the AC equipment is calculated
including all the
losses
that are introduced by the
DC/AC converter or inverter.
When choos-
ing
an inverter, keep in mind
that the performance of the
inverter varies ac-
cording
to the amount of requested
power. An inverter has
better perform-
ance
characteristics when operating
close to its rated power.
Using a 1500
Watt
inverter to power a 25 Watt
load is extremely inefficient. In
order to
avoid
this wasted energy, it is
important to consider not
the peak power of
all
your
equipment, but the peak
power of the equipment that
is expected to op-
erate
simultaneously.
Cables
Once
you know the numbers of
panels and batteries, and
type of regulators
and
inverters that you want to
use, it is necessary to calculate
the length and
the
thickness of the cables
needed to connect the
components together.
The
length
depends
on the location of your the
installation. You should try
to
minimize
the length of the cables
between the regulator,
panels, and batter-
ies.
Using short cables will
minimize lost power and
cable costs.
The
thickness
is
chosen is based on the
length of the cable and
the maxi-
mum
current it must carry. The
goal is to minimize voltage
drops. In order to
calculate
the thickness S of the cable
it is necessary to know:
246
Chapter
7: Solar Power
�
The maximum current IMC that is going to circulate in the
cable. In the case of
the
panel-battery subsystem, it is ImMAX calculated for every
month. In the
battery-load
subsystem it depends on the
way that the loads
are connected.
�
The voltage drop (Va-Vb)
that we consider acceptable in
the cable. The
voltage
drop that results of adding
all possible individual
drops is ex-
pressed
as a percent of the nominal
voltage of the installation.
Typical
maximum
values are:
Voltage
Drop
Component
(%
of VN)
Panel
Array -> Battery
1%
Battery
-> Converter
1%
Main
Line
3%
Main
Line (Illumination)
3%
Main
Line (Equipment)
5%
Typical
acceptable voltage drops in
cables
The
section of the cable is
determined by Ohm's
Law:
S(mm2) = r(
mm2/m)L(m)
ImMAX(A)/
(Va-Vb)(V)
where
S is the section, r is resistivity
(intrinsic property of the
material: for
copper,
0.01286 mm2/m),
and L the length.
S
is chosen taking into
consideration the cables
available in the market.
You
should
choose the immediately
superior section to the one
that is obtained
from
the formula. For security
reasons that are some
minimum values, for
the
cable
that connects panels and
battery, this is a minimum of 6
mm2.
For the
other
sections, that minimum is 4
mm2.
Cost
of a solar installation
While
solar energy itself is free,
the equipment needed to turn
it into useful
electric
energy is not. You not
only need to buy equipment
to transform the
solar
energy in electricity and
store it for use, but
you must also
replace
and
maintain various components of
the system. The problem of
equipment
Chapter
7: Solar Power
247
replacement
is often overlooked, and a
solar system is implemented
with-
out
a proper maintenance
plan.
In
order to calculate the real
cost of your installation, we
include an illustra-
tive
example. The first
thing to do it is to calculate the
initial investment
costs.
Description
Number
Unit
Cost
Subtotal
60W
Solar panel
4
$300
$1,200
(about
$4 / W)
30A
Regulator
1
$100
$100
Wiring
(meters)
25
$1
/ meter
$25
50
Ah Deep cycle bat-
6
$150
$900
teries
Total:
$2,225
The
calculation of our investment
cost is relatively easy once
the system
has
been dimensioned. You just
need to add the price
for each piece
equipment
and the labor cost to
install and wire the
equipments together.
For
simplicity, we do not include
the costs of transport and
installation but
you
should not overlook
them.
To
figure
out how much a system
will really cost to operate
we must estimate
how
long each part will
last and how often
you must replace it. In
accounting
terminology
this is known as amortization. Our
new table will look
like this:
Description
#
Unit
Cost
Subtotal
Lifetime
Yearly
(Years)
Cost
60W
Solar panel
4
$300
$1,200
20
$60
30A
Regulator
1
$100
$100
5
$20
Wiring
(meters)
25
$1
/ meter
$25
10
$2.50
50
Ah Deep
6
$150
$900
5
$180
cycle
batteries
Total:
Annual
Cost:
$2,225
$262.50
248
Chapter
7: Solar Power
As
you see, once the
first investment has been
done, an annual cost
of
$262.50
is expected. The annual cost
is an estimation of the required
capi-
tal
per year to replace the
system components once they
reach the end of
their
useful life.
Table of Contents:
- Where to Begin:Purpose of this book, Fitting wireless into your existing network, Wireless networking protocols
- A Practical Introduction to Radio Physics:What is a wave?, Polarization
- Network Design:Designing the physical network, Mesh networking with OLSR, Estimating capacity
- Antennas & Transmission Lines:Cables, Waveguides, Connectors and adapters, Amplifiers
- Networking Hardware:Wired wireless, Choosing wireless components, Building an access point from a PC
- Security & Monitoring:Physical security, Threats to the network, Authentication
- Solar Power:Solar energy, Photovoltaic system components, The battery
- Building an Outdoor Node:Waterproof enclosures, Providing power, Mounting considerations
- Troubleshooting:Building your team, Proper troubleshooting technique, Common network problems
- Economic Sustainability:Create a Mission Statement, Evaluate the Demand for Potential Offerings
- Case Studies:General advice, Crossing the divide with a simple bridge in Timbuktu, Networking Mérida State
- Appendix A: Resources:Antennas and antenna design, Security
- Appendix B: Channel Allocations
- Appendix C: Path Loss
- Appendix D: Cable Sizes
- Appendix E: Solar Dimensioning:General Data, Component Characteristics
- Glossary